
Boost chatbot engagement with personalized image - Manychat
Do you want to boost chatbot engagement & increase conversion with personalised image? 🖼️
(We have seen 10x chatbot engagement in our offical chatbot after implement this strategy)
You can use this in multiple steps of your chatbot,
For example, start with personalized welcome message or greeting message.
Build loyalty card or membership card for local business, or generate dynamic events ticket, certification, etc
The best is that you can implement this absolutely for FREE!(25000 free impression per month, valued at $350 per month if you use 3rd party service!)
So that’s what this guide is for!
Let me share you step by step tutorial how to set up your first personalised greeting card with Manychat 🙂
- What is image personalization?
- What you are going to learn?
- Overview
- Step by Step tutorial - How to set up your first image personalisation with Manychat
- Step #1: Get ready your Cloudinary account
- Step #2: Save profile image into a user custom field
- Step #3: Upload profile image to Cloudinary
- Step #4: Personalized the image in your Cloudinary account
- Step #5: Use image URL in Manychat
- Overview of Manychat flow
- What you have learned so far
- Ready to use image template
- Ready to use chatbot template
- Step by step video tutorial
- Get instant access for $199
- Join the "image personalization mastery" giveaway
Let’s dive in!
What is image personalisation?
- Before we started.
- Let’s first talk about what it is.
- And why image personalization is important for your chatbot.
What is image personalisation?
Image personalisation means displaying custom images to the user based on their preferences, actions or personal profiles. 🖼️
Instead of showing the same image to every user, you can build great connection & human touch with your audience.
And here are a few user cases your can use in your chatbot marketing:
- Welcome image: Send a personalized welcome image with the user's name & profile image.
- Holiday greeting card: Christmas is coming, 🎄, your can send card with your customer image on the card automatically!
- Loyalty card/membership card: You can build stamp card & loyalty points for your local business. with image personalization.
- Certification: If you are online course creator, when the user complete your course, you can generate a dynamic certification for them.
That's just a few user case, once you learn how to set it up, you can implement this strategy into all areas of your chatbot.👏
In the coming section, you will learn:
- How to build your first greeting card in Manychat🧔
- No coding required, just copy & paste 🧰
- Step by step tutorials to help you start from scratch.
If you complete this blog post, you can easily design your own image template.
(believe me! This will open a new world for you!)
Now, Let's get started.
What are you going to learn?
You might wondering what we are going to build in this blog post.
It's Christmas time of year now. 🎄, 🎅,🦌,☃️
Well, you will learn how to build a personalised Christmas greeting card!
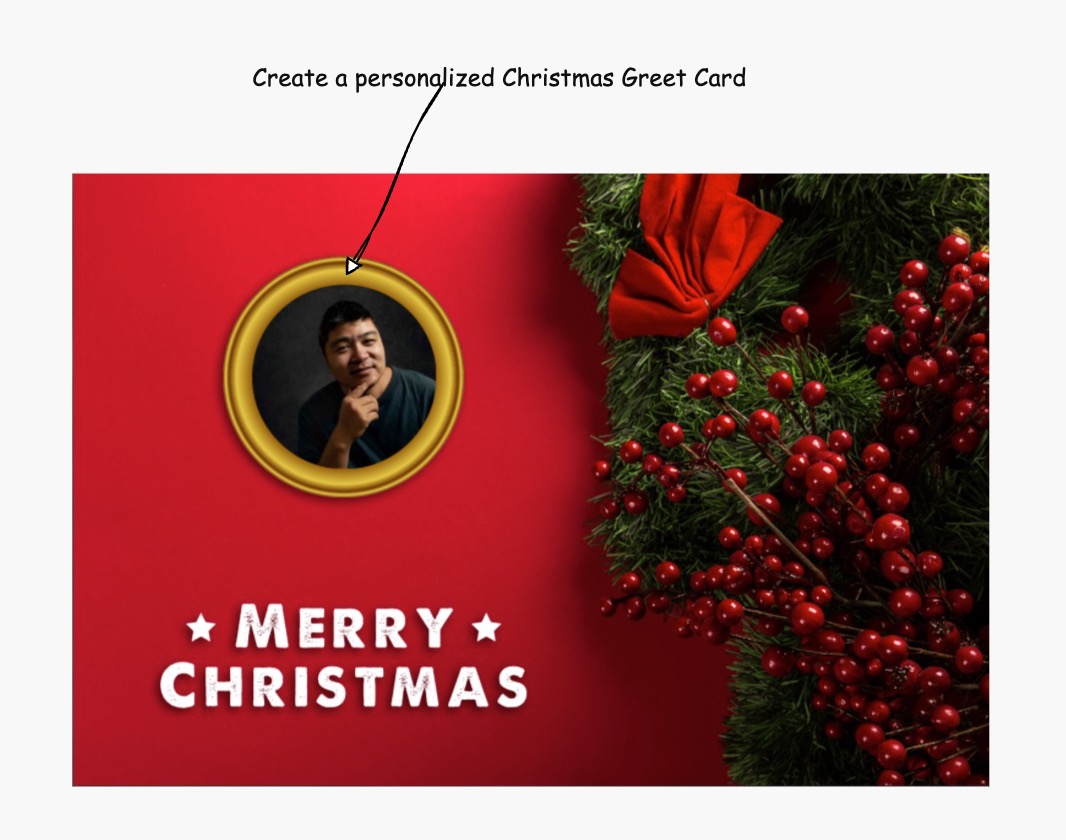
If you send a broadcast, every one will receive this card with their own Facebook profile on the card. 🥳
(It's pretty cool, right? 👍, Below are some of our customer's response)
“I've never think it would be so easy to send personalized image right in my chatbot. Our customer really LOVE it!”
And Jessica feel the same way:
”My clients are blown away by stamp card I have implement for their coffee shop! I can't do this without learning from UChat”– Jessica
I hope you are getting excited by now, right? 🚀👨🚀
Now, Let's get started to build this dynamic greeting card in Manychat.
Overview
I prefer to start with an overview, and explain the basic logic of how this is going to work.
The core message is that the personalised image is just a dynamic URL, which you have the personalized value right in the URL.
As long as you can build out the URL, then you have complete 99% of the work.
Now, back to the greeting card, since we are using user's profile image, so here is the steps we are going to take:
- Get profile image: First step is to get the profile image, and then upload it in your Cloudinary accout for future use.
- Customerize image template: In this part, you will use the profile image & image template to construct to your own liking.
- Use in the chatbot: When the URL is constructed, then you can migrate this link into your chatbot, and replace certain value into user custom field. Then test it, it should all good to go!
- Build your own template: After you learn how to do this simple one, you can learn to build different design of the templates, loyalty card, membership card, etc
Let's get started now 😇
Stey by Step tutorial
- Let's build your first greeting card from scratch.
- Follow the 5 simple steps
- And use the free Cloudinary service for 25000 free impression every month!
Step by Step to set up greeting card
Ok, Let's start by creating your own free Cloudinary account here.
We need to set up some preparation work.
Step #1: Get ready your Cloudinary account
Cloudinary offer you free 25 credits to use for FREE every month, every credit allow you 1000 impression, so that would add up to total 25000 impression per month for free!
Now, Let's lay some ground work to get this started.
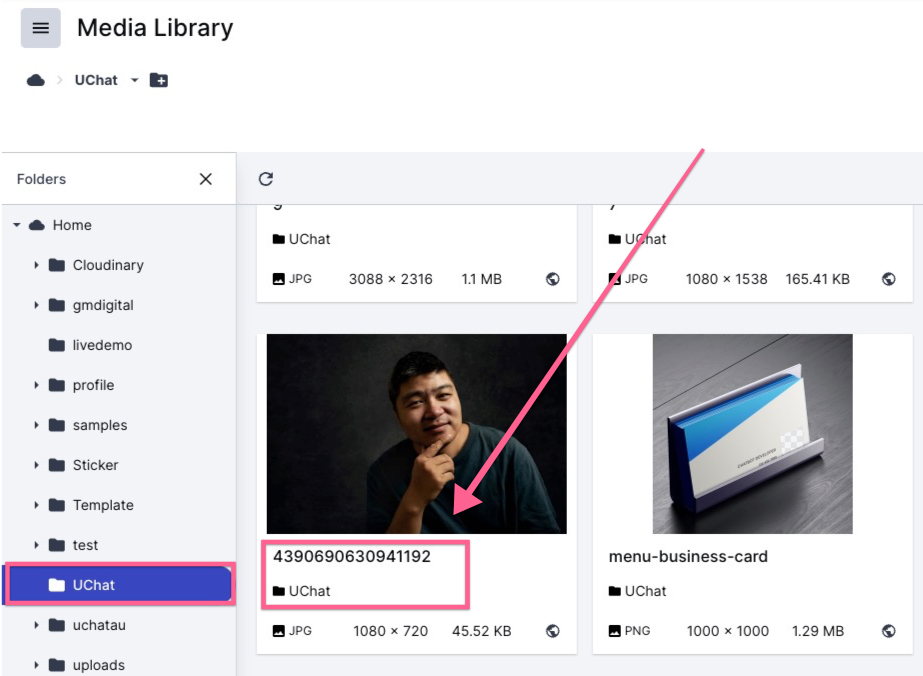
After you login your Cloudinary account, Go to "Media Library" and create a new folder, for example, name it "UChat"
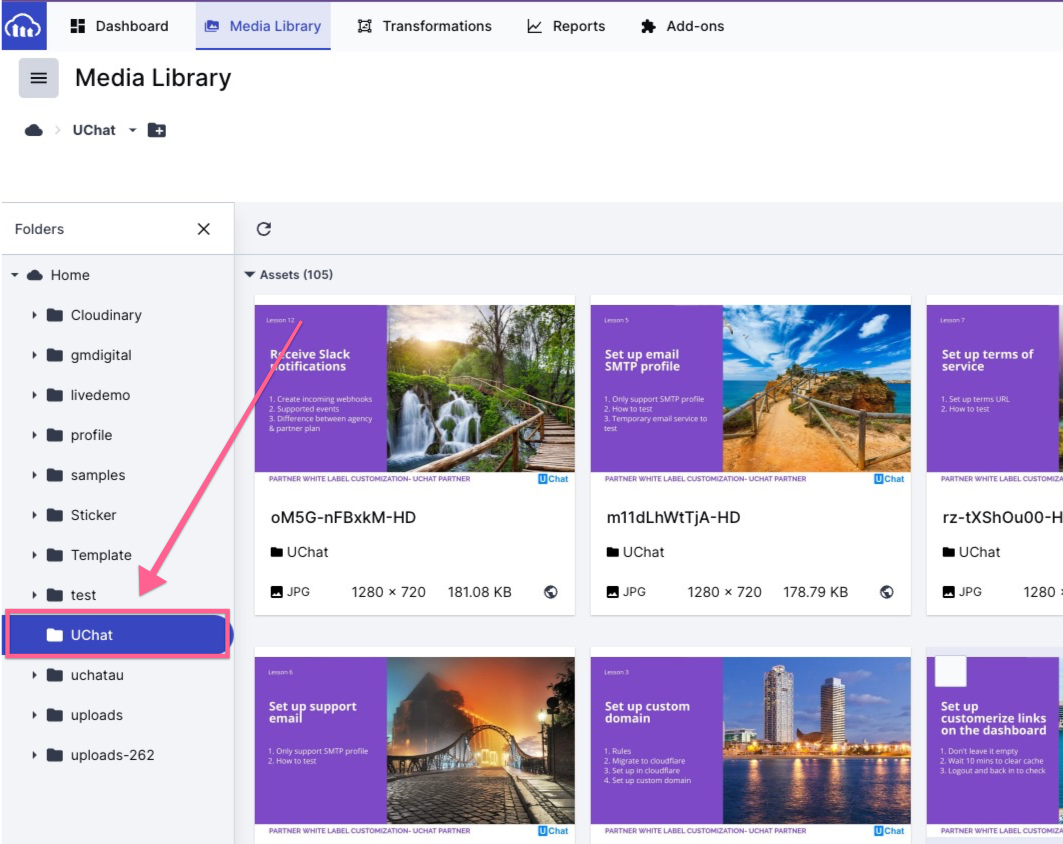
This is the folder we will upload the user's Facebook profile images. And you can also download the "image template" here, and then upload in this "UChat" folder, we are going to use it in the following steps.
Now, you need to set up an upload preset, so click the top right corner "gear icon", and then click "upload",
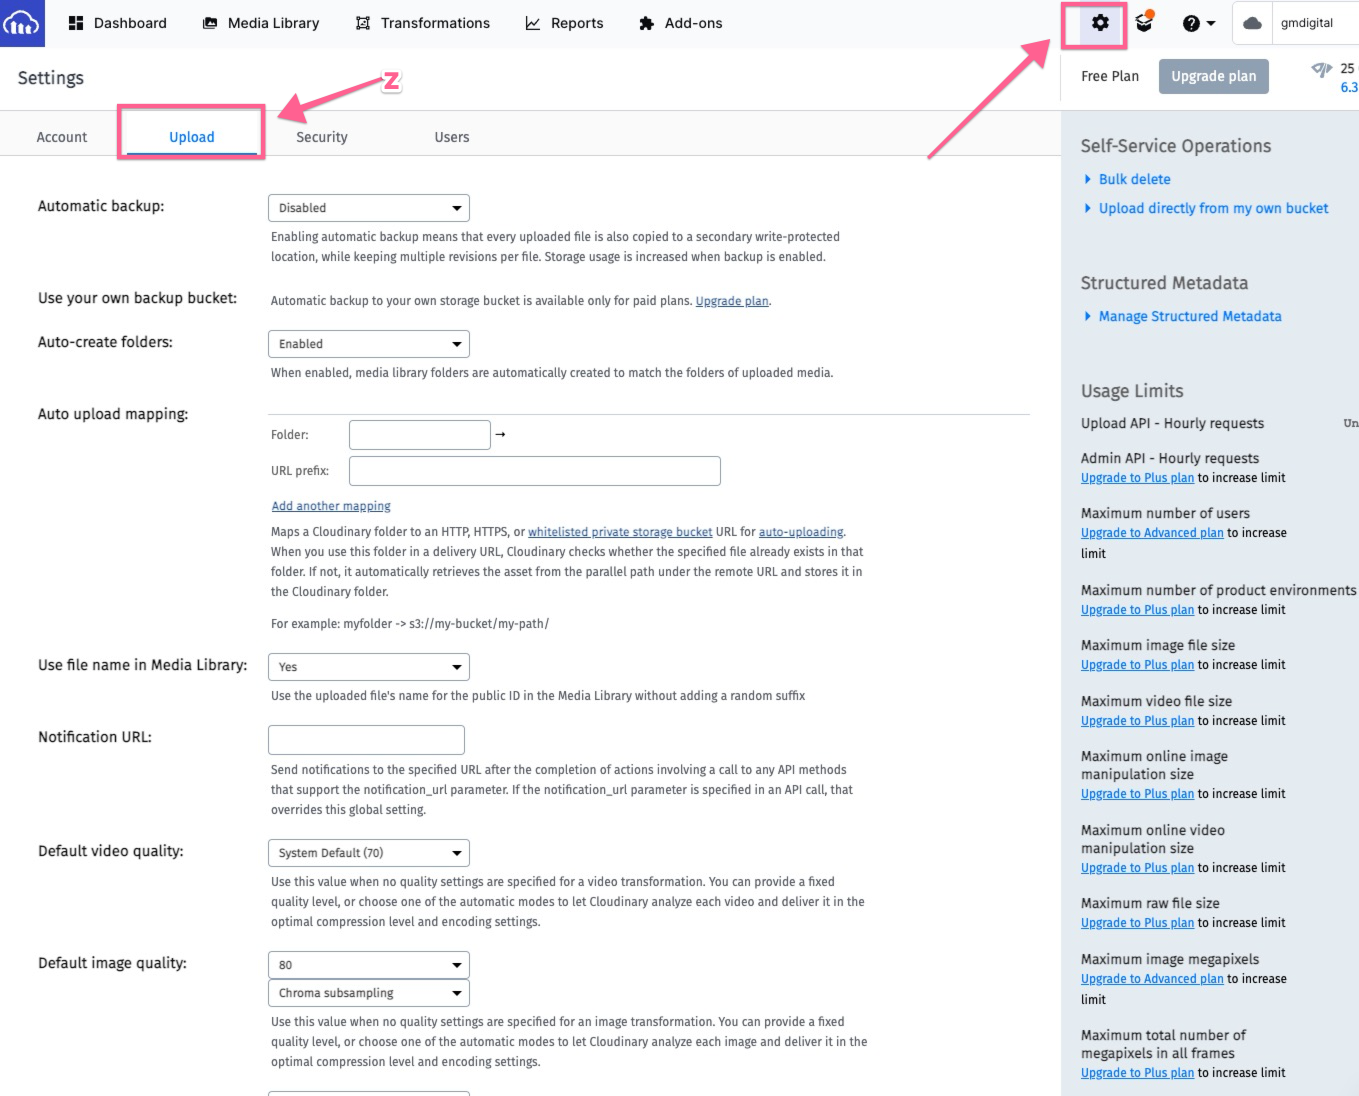
And then you can create your own "upload preset" as per the screenshot below:
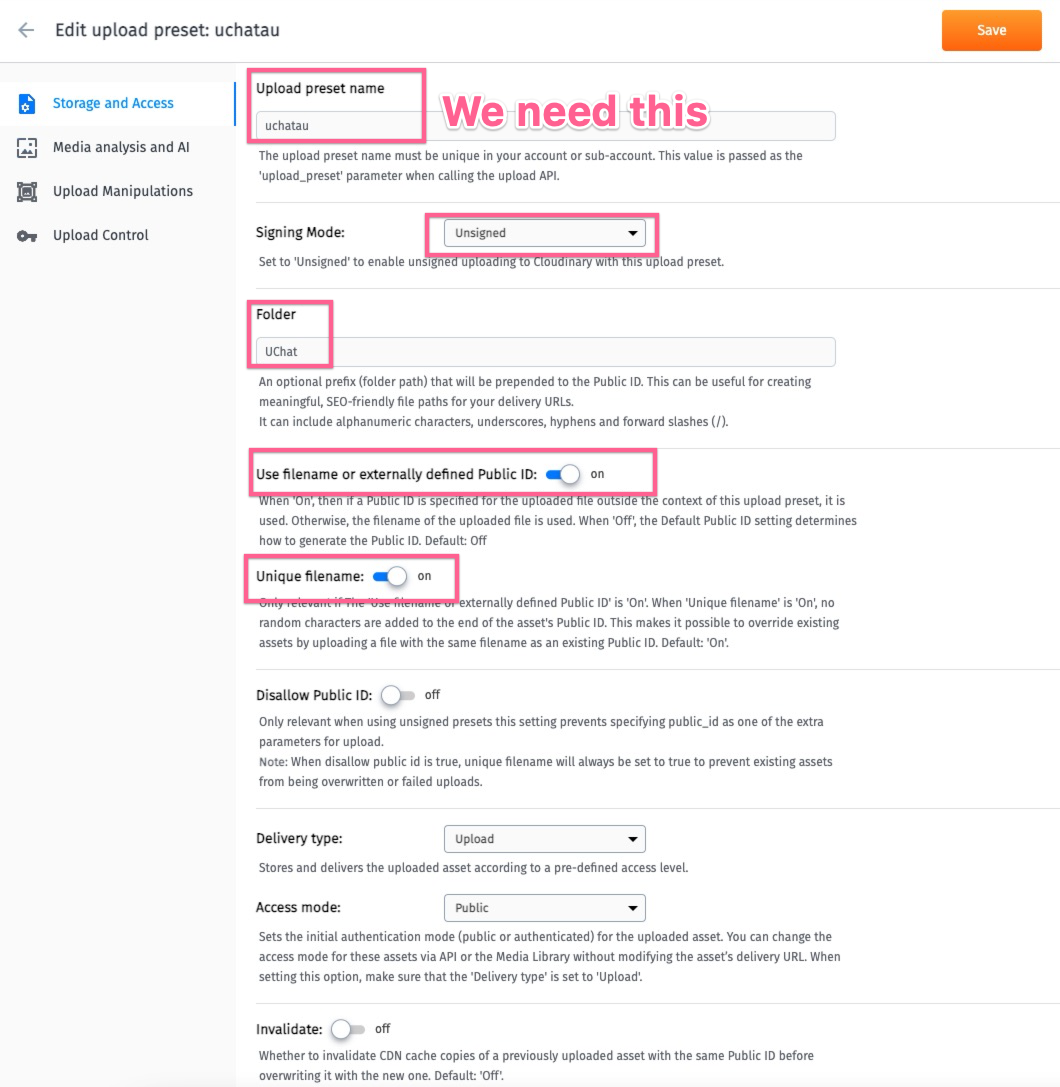
For example, we create an upload preset, name "uchatau", and it’s uploading to the “UChat” folder, and allow you to use unsigned mode to upload, and also have to use unique name & can external define public ID.
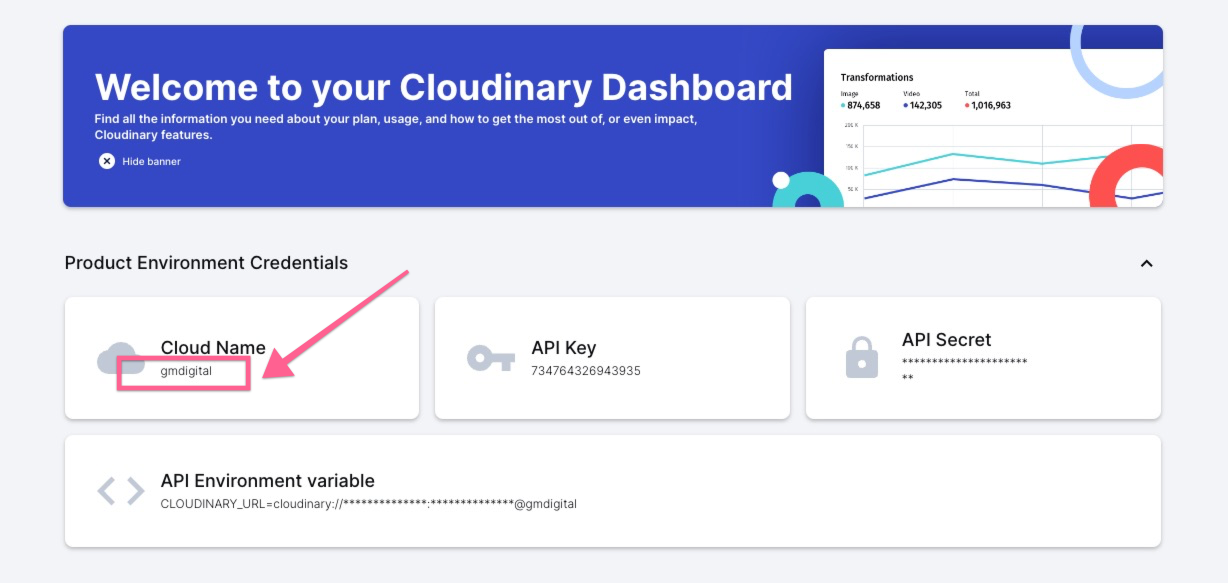
And if you go back to your Cloudinary main dashboard, you will find your “Cloud Name” as per the screenshot below, we will need this value in the next step.
So, that's the end of this step, in this section,
You created a folder in your Cloudinary account,
You upload the image template we are going to use(overlay)
You know where to find your "cloud name" value
You have set up a upload preset, which we are going to use very soon.
If all above step is clear, move down to the Step #2
Step #2: Save profile image into user custom field
Only Manychat need this step, Other chatbot platform like UChat would have the profile image as the system field.
You can use right away! 😊
But Manychat user will need this extra step.
In this step, you need to use "external request" action to save the user's profile picture into one of the user custom field.
Let's create a new user custom field, for example {{user_profile_pic}}

And then you can set up the external request like below to save the user's profile image into the user custom field.
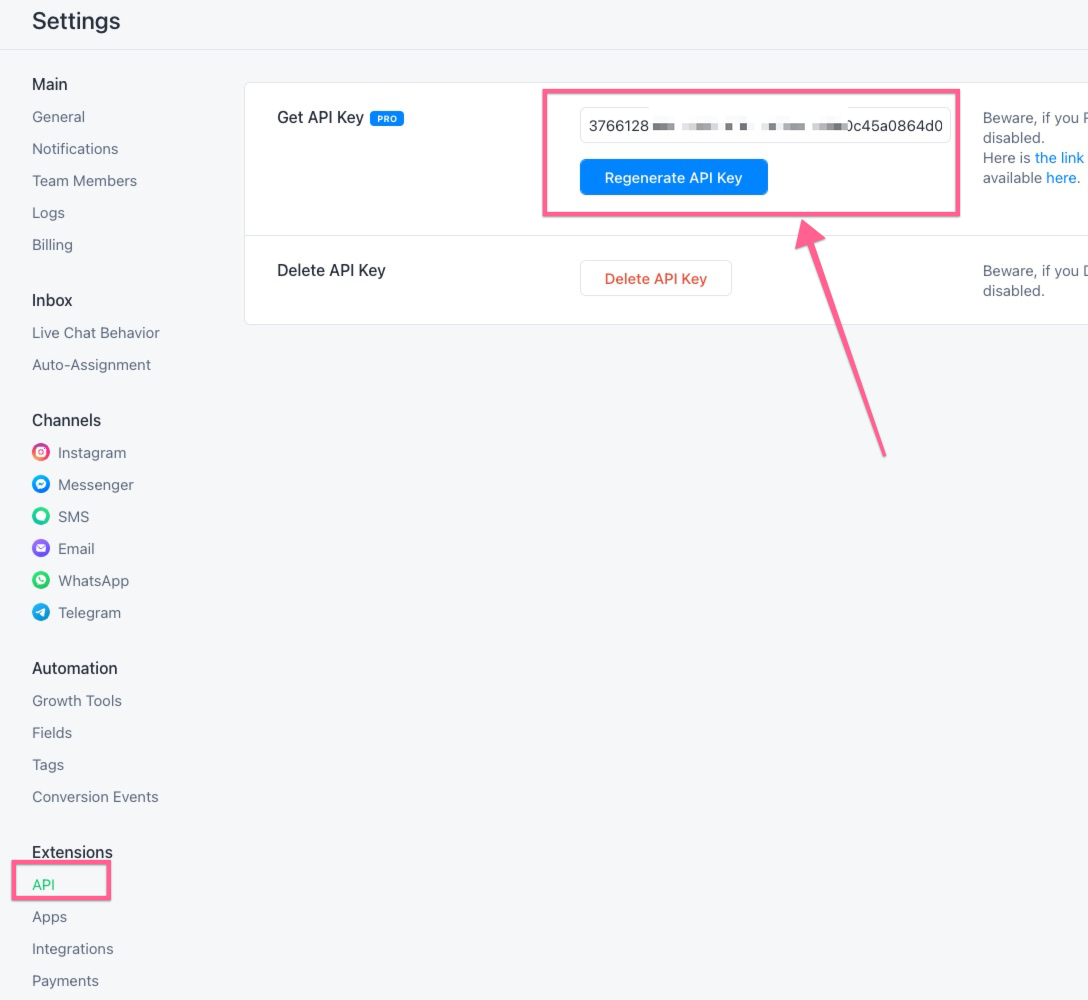
First, you need to get your Manychat API token here:
And then you can set up the external request like below to save the user's profile image into the user custom field.
Here is the list of details you can follow to set up your own external request:
Request type: Get
Request URL: https://api.manychat.com/fb/subscriber/getInfo?subscriber_id={{user_id}}
Headers:
Key: Authorization
Value: Bearer {{Manychat_API_token}}
Response mapping: $.data.profile_pic -> {{user_profile_pic}}
You can print out the {{user_profile_pic}} value after this external request!
Just to make sure you got this step configured correctly!
Step #3: Upload profile image into Cloudinary
In this section, you will learn how to upload the use's profile image automatically to your Cloudinary account.
Only then we can start using the profile image to personalize the greeting card.
So, do you still remember the "Cloud Name" & "upload preset" value in our Step #1, if not. go back to grab these 2 values.
We are going to need them right now.
As you can see from the screenshot above,
Replace the value into your own value.
This external request is about to upload the {{user_profile_pic}} picture into your Cloudinary account.
And as you can see, you have assigned a file name using the {[user_Id}} in the body of the request.
You can find the details external request here:
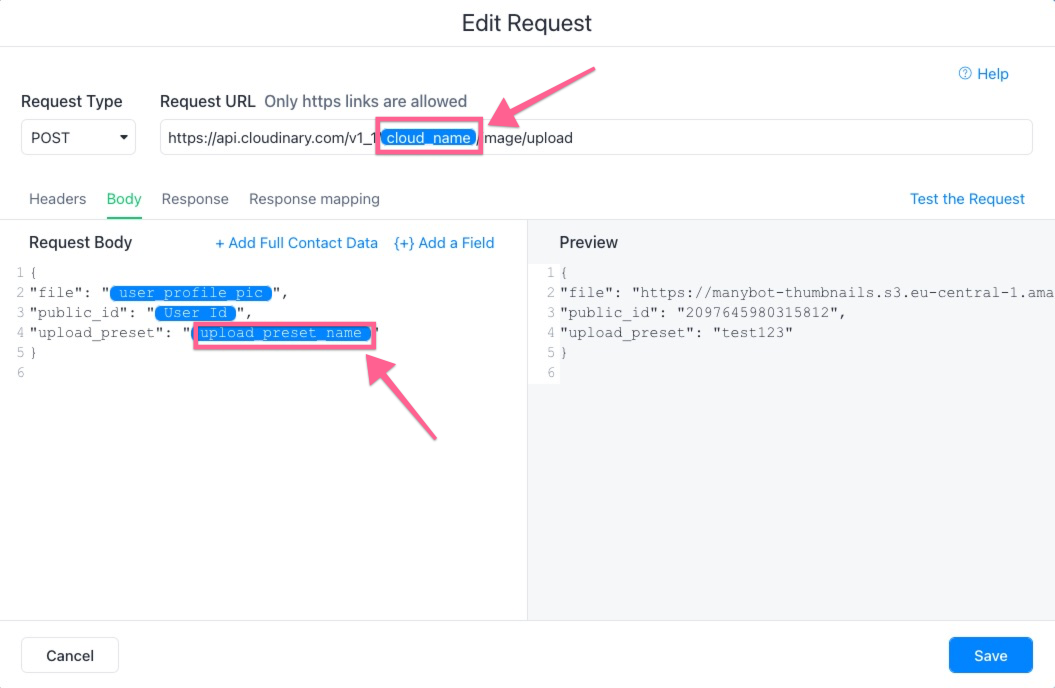
Request type: POST
Request URL: https://api.cloudinary.com/v1_1/{{cloud_name}}/image/upload
Request body:
{
"file": "{{user_profile_pic}}",
"public_id": "{{user_id}}",
"upload_preset": "{{upload_preset_name}}"
}
Response mapping: $.public_id -> {{fileID}}; $.format -> {{image_format}}

The reason that we need to set up response mapping is that we are going to need these values in the image URL in your chatbot.
If you set up everything properly, you should be able to see the profile image been uploaded to the Cloudinary folder as per the screenshot below:
It should be your own Facebook profile upload. And, you should also have a image in the same folder.
The name is "greeting", if not
Download the template image here, and upload into this same folder as per your profile image.
Step #4: Personalized the image in Cloudinary
This is the most important section! 🤭
(you will learn how easy it is to customerize the image)
Please note, Cloudinary is a developer focused tool to allow you to personalised the image.
In fact, a lot of 3rd party image personalization tools based on their platform.
So, it's not easy to customerize the way you want.
But, we have a "Short cut" that can help anyone build their own image personalization.
It's using Cloudinary built-in Image editor! 😉
And in this section, you have the user's profile & the image template, and now we will start do some "MAGIC".
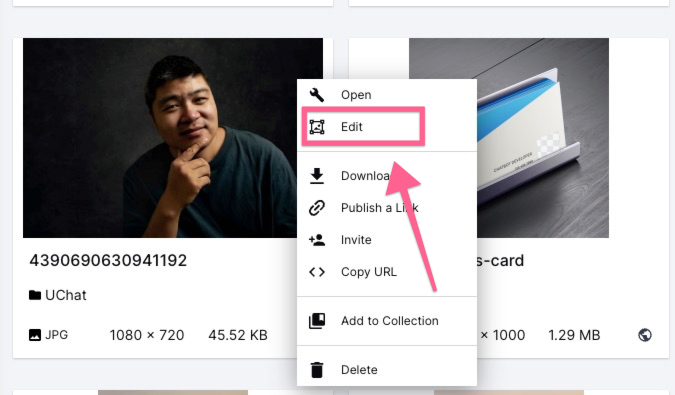
First, let's open your profile image, and then click "Edit", it will open up the built-in image editor.

Every change you make, you can click the "refresh" button on the right image.
it will show you the changes.
So, Let's resize the thumbnail to a "250" width & "250" height, and then in the mode, you can choose "Thumb",
In the Gravity, you can choose "Face", it will automatically detect the face or the interesting part of the image.
Now we have process the profile image.
It's time for us to add the "image overlay".
So click "Add overlay & watermark", and set up the setting per below image

As you can see, in the image ID: you put uchat:greeting.
uchat is the folder name in your Cloudinary account, greeting is the "template image" file name.
The reason we choose "underlay" is to have the profile image visible.
And, you can also adjust the value of x,y, and it will move the profile image to the "proper" location of the image template.

If everything is looking well, you can change the "Layer mode" from "underlay" to "overlay".
And then it will generate the URL from the bottom right corner.
If you open this URL directly. it will show the personalised image.

Now, in the last step, you will need to "migrate" this image URL into Manychat flow.
And it's very important that you can dynamic replace the values in the URL.
Step #5: Use image URL in Manychat
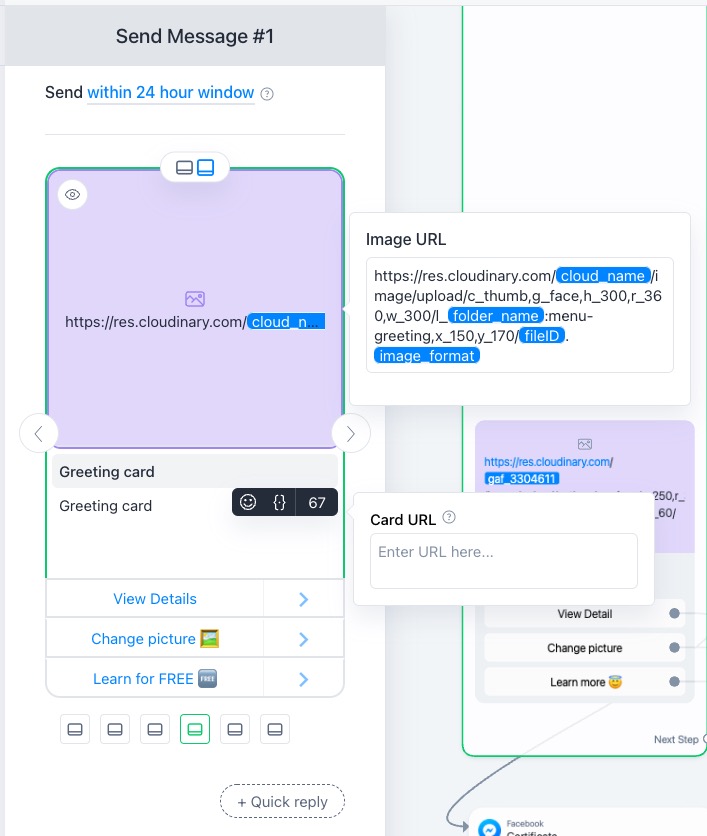
In the image URL generated, you can see, it's a long URL.
There are 3 places, you need to update to your own value or using user's custom field to dynamic replace in the chatbot.
(See these values in Yellow hightligher)

1. Change to your own "Cloud name"
2. UChat:greeting: use your own folder name & image template name
3. UChat/4390690630.jgp this value is saved in the "upload image to Cloudinary" external request. The value should be saved into {{fileID}}.{{image_format}}
So, anywhere in your chatbot, you can insert the image, but using this URL.
It will generate the personalized greeting card email to your subscribers.
Overview of Manychat Flow
Here is two actions, that set up the user's profile image, and then "upload the profile image" to the Cloudinary account.
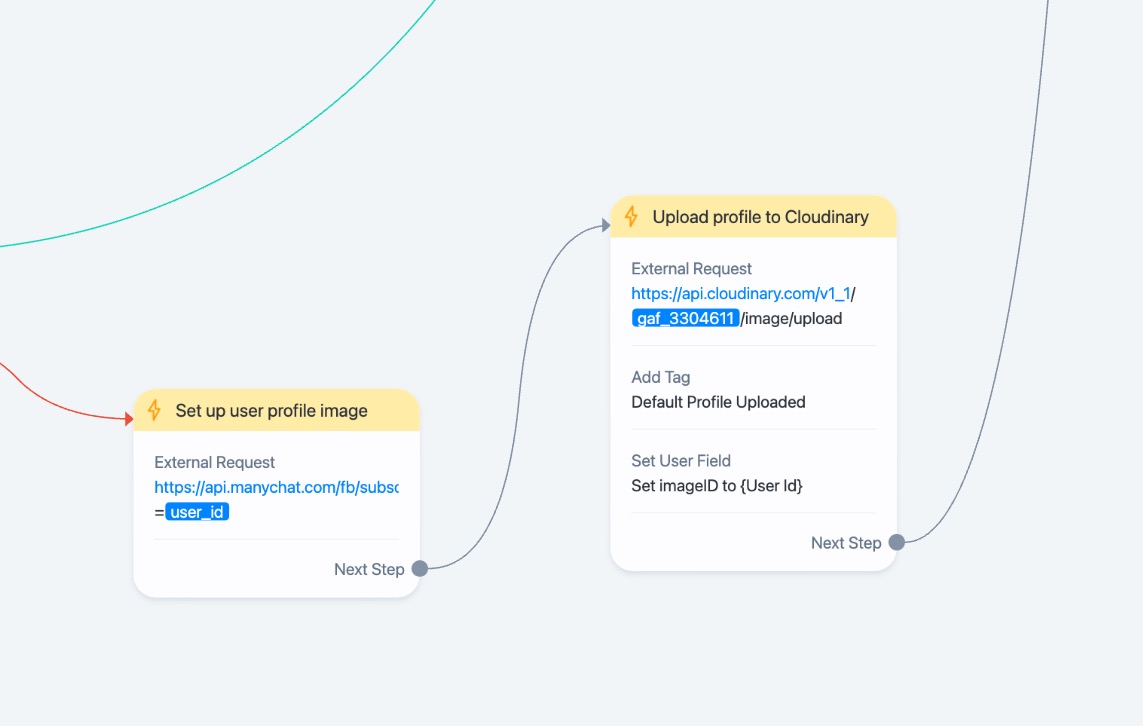
And then you can connect directly the image to show the personalized image.
That's how simple it is to complete your first image personalisation.
You did great so far! 💪
What's Next!
- It's a good start!
- You can make it better.
- Join "Image Personalisation Mastery" Course!
What you have learned so far
You have learned how to add image overlay to a sample image template.
You also familiar with Cloudinary built-in image editor, which can make job super easy for you.
But, do you know that you can add more overlays?
Do you know you can add text overlays? and adjust the font size, styling, etc
Here is a sample image template you can learn from the "Image personalization Mastery" course!

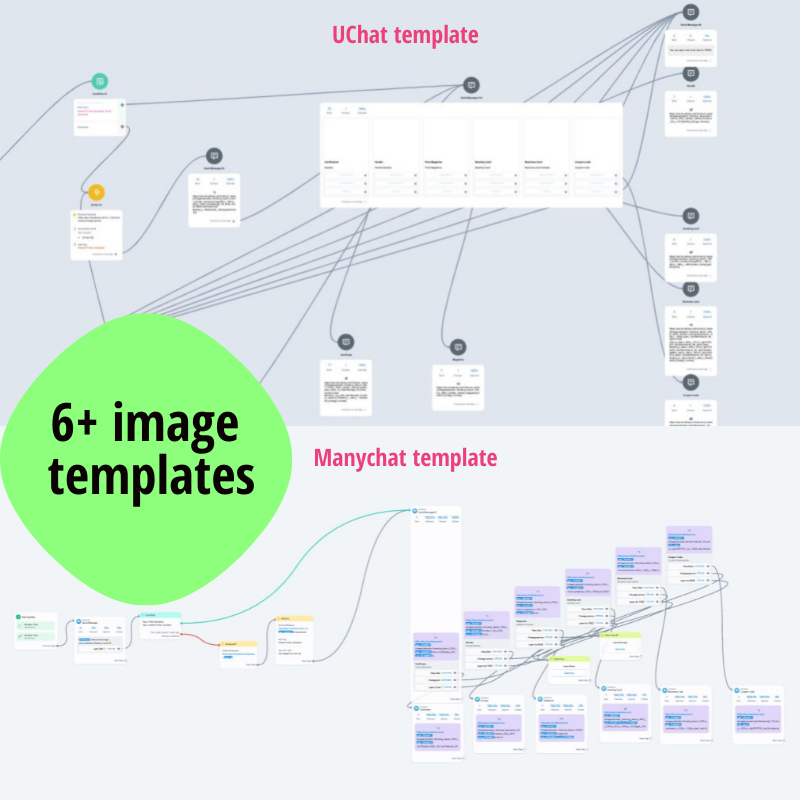
Ready to use image template
You will find more ready to use image template in the training course, some example below
- Certification sample
- Hoodie sample
- Business card sample
- Coupon code sample
- Magazine sample
Check the image template sample below

Ready to use Chatbot template
In this course, you will be able to install the ready to use chatbot template for Manychat & UChat.
You can simply follow our walkthrough videos, and ready to use within 5 mins.
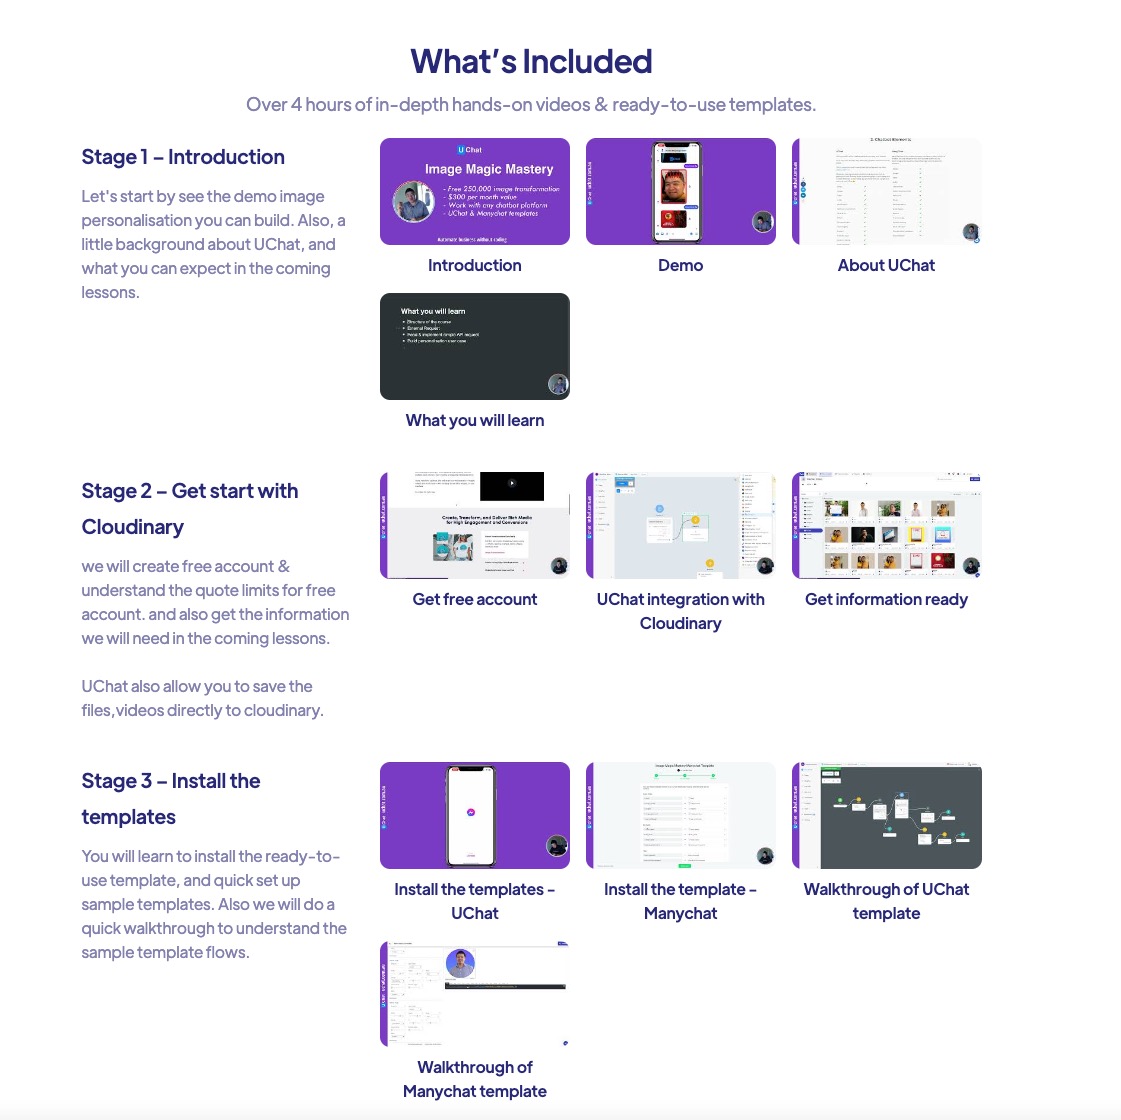
Step by step video tutorials
In this blog post, you can see all the important steps. If you can't follow some of the steps, you will find it much easier to follow our video tutorial.
It's step by step, and will explain everything in great details.
Also, you will be able to ask questions in our Facebook community, we can help you to "master" this.
Get instant access $199 one time payment
You can get instant access for $199 one time payment here, or learn more about the course here.
(If you join our Facebook community & subscribe to our Youtube channel, We have a surprise for you!)
Join the "Image personalization mastery" giveaway
if you join our Facebook community here, take the screenshot.
If you subscribe to our Youtube channel, take the screenshot.
If you share this blog post to your social network, you are qualified to win the giveaway, and get this $199 value course FOR FREE!
Conclusion
Hope you learn a ton about how to set up personalised image in your chatbot.
Keep your subscribers engaged and converting 🤓
Good luck!


